My Blinkies


Love the blog? Take my blinkie and link back to me!
March 14, 2009
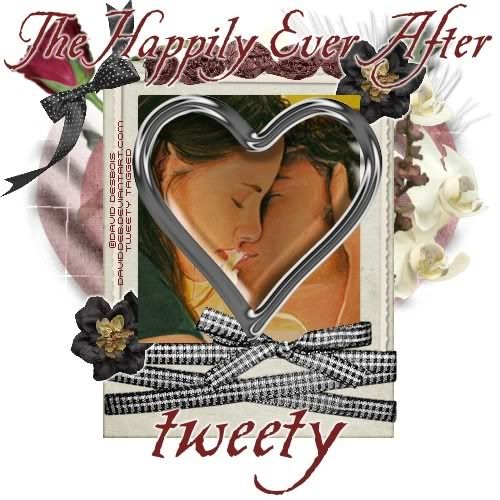
The Happily Ever After
Feel free to use my tutorial in any way you would like. Although it is my ideas that will guide you, please feel free to do whatever you choose with it!
This tutorial assumes you have a working knowledge of PSP.
Needed supplies:
Scrap Kit of choice or the one I am using. This kit is by Pimp'd Tag Scraps and can be purchased at Sophisti-Scraps in the full Saga Collection or as a separate kit.
Masks of Choice: the masks I used came from Chelle under downloads. Her site can be found here
I used WSL_177 and 176.
Plugins: EyeCandy4000, Gradient Glow
Image of choice. My image is by David Desbois. You can visit his deviantart site here. I have permission from him to use his artwork in my tutorials.
Open all supplies needed for this tutorial. Add the mask to your mask file or open them in PSP. I use these quite a bit.
Copy and paste pp12 as a new layer. Layers, Load/Save Mask, Load mask from Disk, choose Mask177 by WSL. Merge Group.
Copy and paste pp11 as a new layer. Layers, Load/Save Mask, Load mask from Disk, choose Mask176 by WSL. Merge Group. Merge the mask layers together.
Copy and paste the wrapped-frame. Resize to fit the tag. Copy and paste your image of choice and resize to fit. Click inside the frame using your magic wand and selections, modify, expand by 5. Selections, invert. Hit delete on your image layer.
Add your elements of choice. See tag for exact placement and resize as necessary. I added:
rose to the left of the frame rotated to stick out on the left.
feather to the right top of the frame rotated to stick out on the right.
green-01 to the right top of the frame mirrored and sticking out on the right.
flora-03 to the right top of the frame sticking out on the right.
flora-01 to the top right of the frame sticking out on the right.
flora-frame-paper rotated 90 degrees right. Move this over the image and using your eraser erase the bottom frame so the top frame is in the image.
old-frame-01 around the frame already in place. Erase the bottom of the frame so it looks like it is under the ribbon.
heart-locket over the image like it frames the picture.
bow-01 over the rose rotated so it appears to be on the stem.
ribbon-roses resized and placed just above the top of the frame, centered.
flower-02 to the bottom of the frame over the old-frame-01 layer. White 3.0 medium gradient glow to this element.
flower-01 on the bottom of the frame over the flower-02. Merge this layer with the other frame layer. Duplicate this pair and move to the top right of the frame.
Add any other elements of your choice.
Drop shadow your layers and merge them where you would like.
Add your copyright at this time for the scrapkit.
Add your text of choice, I used Be Safe (Edward Cullen's Font). You can google to find it. I added a medium 3.0 white glow to my font. I also added "The Happily Ever After" to the top of the tag.
Hope you enjoyed this tutorial! Please feel free to send me your results!

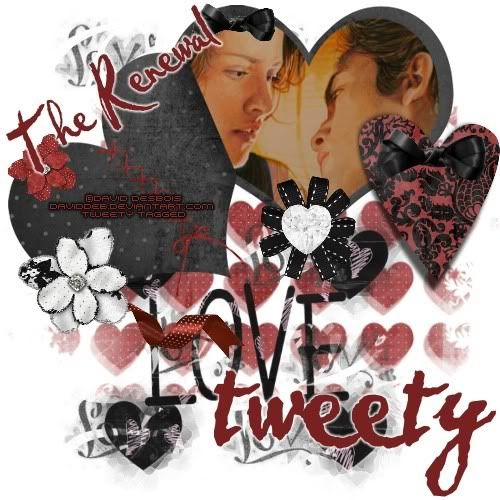
The Renewal
Feel free to use my tutorial in any way you would like. Although it is my ideas that will guide you, please feel free to do whatever you choose with it!
This tutorial assumes you have a working knowledge of PSP.
Needed supplies:
Scrap Kit of choice or the one I am using. This kit is by Pimp'd Tag Scraps and can be purchased at Sophisti-Scraps in the full Saga Collection or as a separate kit.
Masks of Choice: the masks I used came from Vix under goodies. Her site can be found here
I used Vix316, 30 and 312.
Plugins: EyeCandy4000, Gradient Glow
Image of choice. My image is by David Desbois. You can visit his deviantart site here. I have permission from him to use his artwork in my tutorials.
Open all supplies needed for this tutorial. Add the mask to your mask file or open them in PSP. I use these quite a bit.
Copy and paste pp06 as a new layer. Layers, Load/Save Mask, Load mask from Disk, choose Mask316 by Vix. Merge Group.
Copy and paste pp04 as a new layer. Layers, Load/Save Mask, Load mask from Disk, choose Mask30 by Vix. Merge Group. Make this mask layer smaller and then move toward the bottom middle of the tag.
Copy and paste the heart-frame. Resize to fit the tag. Move to the top of the tag. Copy and paste your image of choice and resize to fit. Click inside the frame using your magic wand and selections, modify, expand by 5. Selections, invert. Hit delete on your image layer.
Add your elements of choice. See tag for exact placement and resize as necessary. I added:
This tutorial assumes you have a working knowledge of PSP.
Needed supplies:
Scrap Kit of choice or the one I am using. This kit is by Pimp'd Tag Scraps and can be purchased at Sophisti-Scraps in the full Saga Collection or as a separate kit.
Masks of Choice: the masks I used came from Vix under goodies. Her site can be found here
I used Vix316, 30 and 312.
Plugins: EyeCandy4000, Gradient Glow
Image of choice. My image is by David Desbois. You can visit his deviantart site here. I have permission from him to use his artwork in my tutorials.
Open all supplies needed for this tutorial. Add the mask to your mask file or open them in PSP. I use these quite a bit.
Copy and paste pp06 as a new layer. Layers, Load/Save Mask, Load mask from Disk, choose Mask316 by Vix. Merge Group.
Copy and paste pp04 as a new layer. Layers, Load/Save Mask, Load mask from Disk, choose Mask30 by Vix. Merge Group. Make this mask layer smaller and then move toward the bottom middle of the tag.
Copy and paste pp03 as a new layer. Layers, Load/Save Mask, Load mask from Disk, choose Mask312 by Vix. Merge Group.
Copy and paste the heart-frame. Resize to fit the tag. Move to the top of the tag. Copy and paste your image of choice and resize to fit. Click inside the frame using your magic wand and selections, modify, expand by 5. Selections, invert. Hit delete on your image layer.
Add your elements of choice. See tag for exact placement and resize as necessary. I added:
tied to the heart-frame rotated until it fits the heart.
crimson-ribbon to the left middle of the tag on the frame layer.
lifted-tag-heart to the right middle of the tag on the frame layer.
lil-bow to the top of the frame layer.
ribbon-flower01 to the bottom in the middle of the 2nd heart in the frame.
ice-heart on top of the ribbon-flower01 as a middle accent.
flower-03 covering crimson-ribbon on the left of the frame.
flower-02 to the top of the 1st heart on the frame.
Add any other elements of your choice.
Drop shadow your layers and merge them where you would like.
Add your copyright at this time for the scrapkit.
Add your text of choice, I used Pablo (Bella Swan's Font). You can google to find it. I added a medium 3.0 white glow to my font. I also added "The Renewal" to the top of the tag rotated 35 degrees to the left.
Hope you enjoyed this tutorial! Please feel free to send me your results!
The Pause

Feel free to use my tutorial in any way you would like. Although it is my ideas that will guide you, please feel free to do whatever you choose with it!
This tutorial assumes you have a working knowledge of PSP.
Needed supplies:
Scrap Kit of choice or the one I am using. This kit is by Pimp'd Tag Scraps and can be purchased at Sophisti-Scraps in the full Saga Collection or as a separate kit.
Masks of Choice: the masks I used came from Vix under goodies. Her site can be found here
I used Vix237 and 238.
Plugins: EyeCandy4000, Gradient Glow
Image of choice. My image is by David Desbois. You can visit his deviantart site here. I have permission from him to use his artwork in my tutorials.
Open all supplies needed for this tutorial. Add the mask to your mask file or open them in PSP. I use these quite a bit.
Copy and paste pp1 as a new layer. Layers, Load/Save Mask, Load mask from Disk, choose Mask238 by Vix. Merge Group. Copy and paste pp09 as a new layer. Layers, Load/Save Mask, Load mask from Disk, choose Mask238 by Vix. Merge Group.
Copy and paste the frame. Resize to fit the tag. Move to the left of the tag. Copy and paste your image of choice and resize to fit. Click inside the frame using your magic wand and selections, modify, expand by 5. Selections, invert. Hit delete on your image layer. Copy and paste circle-frame as a new layer. Move to the top right of your tag. Copy and paste your image of choice and resize to fit. Click inside the frame using your magic wand and selections, modify, expand by 5. Selections, invert. Hit delete on your image layer.
Add your elements of choice. See tag for exact placement and resize as necessary. I added:
rusty-screw to the top right of the top frame.
rusty-eyelet to the top right of the top frame under the rusty-screw.
leaf-01 to the bottom under the bottom frame.
woodland to the bottom of the bottom frame.
worn-heart to the middle of the two frames toward the top corner of the bottom frame.
wrapped-bow to the bottom frame toward the bottom.
flower-01 to the right side of the wrapped-bow.
flower-02 to the left side of the wrapped-bow.
natural-tag-line rotated 90 degrees right and placed on the right of the bottom frame.
heart-trinket to the middle of the frames.
Add any other elements of your choice.
Drop shadow your layers and merge them where you would like.
Add your copyright at this time for the scrapkit.
Add your text of choice, I used Almagro Regular (Jacob Black's Font). You can google to find it. I added a medium 3.0 brown glow to my font. I also added "The Pause" to the top of the tag.
Hope you enjoyed this tutorial! Please feel free to send me your results!
March 13, 2009
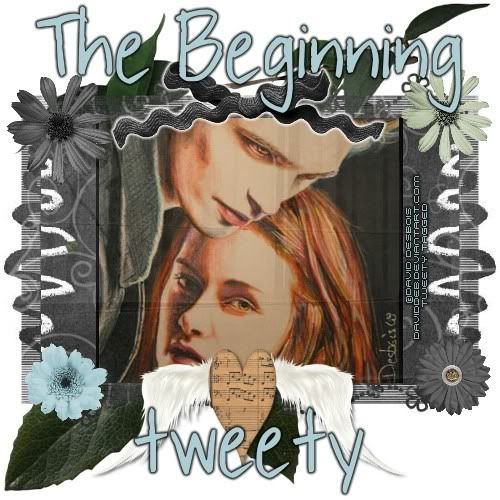
The Beginning
Feel free to use my tutorial in any way you would like. Although it is my ideas that will guide you, please feel free to do whatever you choose with it!
This tutorial assumes you have a working knowledge of PSP.
Needed supplies:
Scrap Kit of choice or the one I am using. This kit is by Pimp'd Tag Scraps and can be purchased at Sophisti-Scraps in the full Saga Collection or as a separate kit.
Masks of Choice: the masks I used came from Chelle under downloads. Her site can be found here
I used Chelle's WSL233.
Plugins: EyeCandy4000, Gradient Glow
Image of choice. My image is by David Desbois. You can visit his deviantart site here. I have permission from him to use his artwork in my tutorials.
Open all supplies needed for this tutorial. Add the mask to your mask file or open them in PSP. I use these quite a bit.
Copy and paste pp8 as a new layer. Layers, Load/Save Mask, Load mask from Disk, choose Mask233 by WSL. Merge Group. Copy and paste pp12 as a new layer. On the mask layer click selections, select all, selections, float, selections, defloat, selections, invert. Now hit delete on the pp12 layer. Reduce the transparency of this layer to 18. Do not deselect.
Copy and paste your image of choice. After it is centered using your move and resize tools, hit delete on your keyboard. Move this layer under pp12, which will create an overlay effect. Selections, Select None.
Add your elements of choice. See tag for exact placement and resize as necessary. I added:
green-01 to the bottom most layer, moved toward the top and mirrored.
green-01 to the bottom, moved toward the bottom.
rr-bow-01 to the top and a white 3.0 medium gradient glow.
flower-03 to the top left of the mask frame.
flower-04 to the bottom right of the mask frame.
flower-02 to the top right of the mask frame.
flower-01 to the bottom left of the mask frame.
feather-heart to the middle bottom of the mask frame, and a light drop shadow. I used 2, 2, 58, 4.
Add any other elements of your choice.
Drop shadow your layers and merge them where you would like.
Add your copyright at this time for the scrapkit. I added a gradient glow to my copyright.
Add your text of choice, I used Pea Sue Print. You can google to find it. I added a medium 3.0 white glow to my font. I also added "The Beginning" to the top of the tag.
Hope you enjoyed this tutorial! Please feel free to send me your results!
Subscribe to:
Posts (Atom)
About Me

Want to receive some of the tutorial tags created by me?

Click to join tweetytags