My Blinkies


Love the blog? Take my blinkie and link back to me!
November 11, 2009
Her Lullaby

Feel free to use my tutorial in any way you would like. Although it is my ideas that will guide you, please feel free to do whatever you choose with it!
This tutorial assumes you have a working knowledge of PSP.
Needed supplies:
Scrap Kit of choice or the one I am using. This kit is by Pimp'd Tag Scraps and can be purchased at Sophisti-Scraps called Her Lullaby.
Masks of Choice: the masks I used came from the kit.
Image of choice. My image is by David Desbois. You can visit his deviantart site here. I have permission from him to use his artwork in my tutorials.
Plugins: If so desired I used EyeCandy4000, Gradient Glow.
Open all supplies needed for this tutorial. Add the mask to your mask file or open them in PSP.
Open cc-hl-pp-07. Add your mask to this layer. I used cc-hl-mask for the mask. Merge group.
Layers, New Raster Layer, flood fill with white drag under the mask.
Copy and paste cc-hl-frame-05 as a new layer. Drop shadow as desired.
Copy and paste cc-hl-pp-12. Using your magic wand, select inside the frame layer, Selections, Modify, Expand by 5, Selections, Invert. Hit delete on your keyboard for the paper layer.
Misting an image is very easy. Using your magic wand, freehand selection, use these options:
 Click on the image and choose Promote Background Layer. Now, start anywhere in the image you want to begin. What you are going to do is left click to place the pointer and then move the line to the next point and click again to make a rough cutout of the portion of the image you would like to mist. When you are done, right click and the selection will be made. Then, hit delete on your keyboard once or twice to feather the image around it.
Add your tube of choice. I copied and pasted cc-hl-pp-06 paper to the frame, and then on the tube layer: Selections, Select all. Selections, Float. Selections, defloat. Selections, invert. Delete the paper and change the tube overlay to Luminance: Legacy. Erase any portions that may be sticking out under the frame.
Add your elements of choice. See tag for exact placement and resize as necessary. I added:
cc-hl-cloud to the top of the frame, under the paper layer but above the mask layer. Duplicate and flip.
cc-hl-flower-01 full size above the cloud layer.
cc-hl-stitch to the top of the frame layer.
cc-hl-red-feather to the bottom left of the frame layer.
cc-hl-flower-01 to the bottom left of the frame layer.
cc-hl-gift to the bottom left of the frame layer.
cc-hl-apple to the bottom left of the frame layer.
cc-hl-piano to the bottom right of the frame layer.
cc-hl-bow-03 to the top left of the frame layer.
Add any other elements of your choice.
Drop shadow your layers and merge them where you would like.
Add your copyright at this time.
Add your text of choice. I used Ephesis ROB a pay font. I also added a gradient glow to my tag with these settings:

Hope you enjoyed this tutorial! Please feel free to send me your results!

September 19, 2009
Lion and the Lamb

My good friend Susan did a tutorial with a Twilight themed kit by Pimp'd called Lullaby. It was dedicated to me, so go on over there and check it out. She did an amazing job with the kit, especially since she only hears about all the hype and hasn't read the books or seen the movie!
Lion and the Lamb
May 18, 2009
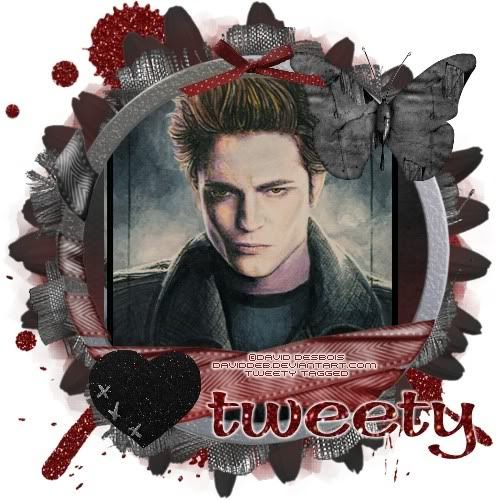
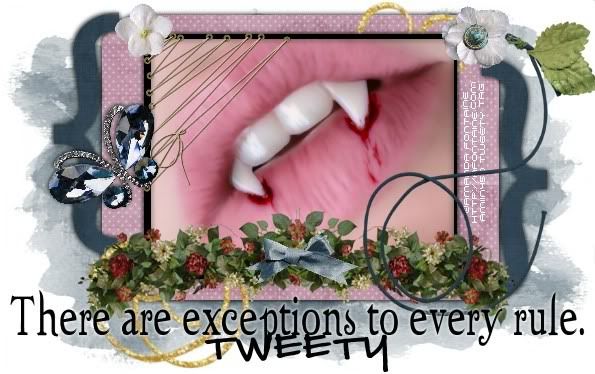
The Saga : Bad Vamps
Feel free to use my tutorial in any way you would like. Although it is my ideas that will guide you, please feel free to do whatever you choose with it!
This tutorial assumes you have a working knowledge of PSP.
Needed supplies:
Scrap Kit of choice or the one I am using. This kit is by Pimp'd Tag Scraps and can be purchased at Sophisti-Scraps called The Saga : Bad Vamps.
Masks of Choice: the masks I used came from Chelle under downloads. Her site can be found here.
I used WSL_219.
Image of choice. My image is by David Desbois. You can visit his deviantart site here. I have permission from him to use his artwork in my tutorials.
Open all supplies needed for this tutorial. Add the mask to your mask file or open them in PSP. I use these quite a bit.
Open frame-04. Shift + D to duplicate your frame layer. Close out the original frame layer. Image, resize, resize to 500x500 all layers checked. Resize this layer by 85%
Layers, New Raster Layer, flood fill with white. Layers New Raster Layer.
Copy and paste pp07 as a new layer. Layers, Load/Save Mask from Disk, Load Mask, Choose Chelle's WSL_219. Merge, merge group. This layer should be just above your white background.
Copy and paste pp10. Using your magic wand, select inside the frame layer, Selections, Modify, Expand by 5, Selections, Invert. Hit delete on your keyboard for the paper layer.
Add your elements of choice. See tag for exact placement and resize as necessary. I added:
splat-01 to the bottom right of the tag above the white layer.
splat-02 to the bottom left of the tag above the white layer.
splat-03 to the top left of the tag above the white layer.
flower-03 resized 85% above the mask layer.
flower-02 resized 85% above the mask layer.
cloud to the top of the frame layer above the paper layer erase any sticking out of the frame.
black-heart to the bottom left of the frame layer.
bow-01 to the top middle of the frame layer.
dark-fly to the top right of the frame layer.
Add any other elements of your choice.
Misting an image is very easy. Using your magic wand, freehand selection, use these options:
Click on the image and choose Promote Background Layer. Now, start anywhere in the image you want to begin. What you are going to do is left click to place the pointer and then move the line to the next point and click again to make a rough cutout of the portion of the image you would like to mist. When you are done, right click and the selection will be made. Then, hit delete on your keyboard once or twice to feather the image around it.Now add your misted image to the tag! Erase any portions that may be sticking out under the frame.
Drop shadow your layers and merge them where you would like.
Add your copyright at this time for the scrapkit.
Add your text of choice. In your background, choose pattern. While your Bonus Glitter is open. Change the scale to 50, I used A&S Bone Casual for the text and the font, with a medium 3.0 white gradient glow if desired. You could also use a white drop shadow to create the same results.
Hope you enjoyed this tutorial! Please feel free to send me your results!
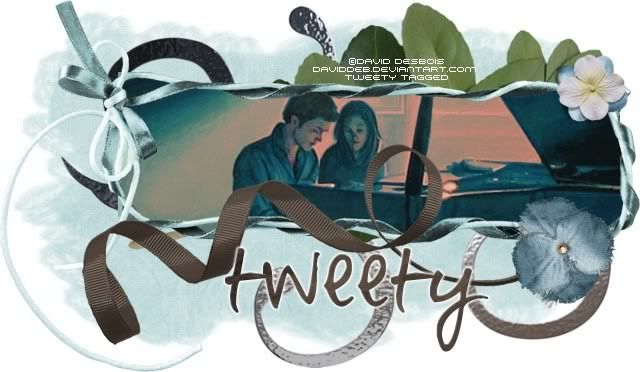
The Saga : Bella's Lullaby

Feel free to use my tutorial in any way you would like. Although it is my ideas that will guide you, please feel free to do whatever you choose with it!
This tutorial assumes you have a working knowledge of PSP.
Needed supplies:
Scrap Kit of choice or the one I am using. This kit is by Pimp'd Tag Scraps and can be purchased at Sophisti-Scraps called The Saga : Bella's Lullaby
Masks of Choice: the masks I used came from Chelle under downloads. Her site can be found here.
I used WSL_220.
Image of choice. My image is by David Desbois. You can visit his deviantart site here. I have permission from him to use his artwork in my tutorials.
Open all supplies needed for this tutorial. Add the mask to your mask file or open them in PSP. I use these quite a bit.
Open 500x500 image. Floodfill with white.
Copy and paste pp08. Layers, Load/Save Mask from Disk, Load Mask, Choose Chelle's WSL_220. Merge, merge group. This layer should be just above your white background.
Add your elements of choice. See tag for exact placement and resize as necessary. I added:
frame-04 to the middle of the canvas.
music-notes to the bottom of the frame layer. Duplicate and merge down to brighten.
bellas-lullaby-sheet to the bottom left of the frame rotated manually.
old-book to the bottom left of the frame rotated manually on top of the lullaby sheet.
music-note to the bottom left of the frame rotated manually on top of the book. I added a medium 3.0 gradient glow in grey to the music note to make it stand out.
ribbon-charmed to the top right of the frame layer.
bow-03 music-note to the bottom left of the frame rotated manually next to the music note.
butterfly to the top left of the frame.
flower-03 to the bottom right of the frame layer.
Add any other elements of your choice.
Add your image or tube of choice. When it is added, use your magic wand to select inside the frame. Selections, Modify, Expand, 3, Selections, Invert. On your tube/image layer, hit delete on your keyboard.
Drop shadow your layers and merge them where you would like.
Add your copyright at this time for the scrapkit.
Add your text of choice, I used Pea Lis for the text and the font, with a medium 3.0 white gradient glow if desired. You could also use a white drop shadow to create the same results.
Hope you enjoyed this tutorial! Please feel free to send me your results!
The Saga Add On 2 : Bella
Feel free to use my tutorial in any way you would like. Although it is my ideas that will guide you, please feel free to do whatever you choose with it!
This tutorial assumes you have a working knowledge of PSP.
Needed supplies:
Scrap Kit of choice or the one I am using. This kit is by Pimp'd Tag Scraps and can be purchased at Sophisti-Scraps called The Saga Add On 2 : Bella.
Masks of Choice: the masks I used came from Chelle under downloads. Her site can be found here.
I used WSL_255.
Image of choice. My image is by David Desbois. You can visit his deviantart site here. I have permission from him to use his artwork in my tutorials.
Open all supplies needed for this tutorial. Add the mask to your mask file or open them in PSP. I use these quite a bit.
Open ribbon-frame. Shift + D to duplicate your frame layer. Close out the original frame layer.
Layers, New Raster Layer, flood fill with white. Layers New Raster Layer. We are going to make a pattern to floodfill this layer with.
Because the papers are not large enough for this canvas, we need to make a pattern from the paper. Open pp01, and make a seamless tile using your Effects, Image Effects, Seamless Tiling. Corner, Bidirectional, 0, 0, 50 (greyed out), 50, linear. Now, choose pp01 as the background pattern and flood fill the new raster layer. Layers, Load/Save Mask from Disk, Load Mask, Choose Chelle's WSL_255. Merge, merge group. This layer should be just above your white background.
Add your elements of choice. See tag for exact placement and resize as necessary. I added:
swirl rotated 90 degrees right and moved to the right a little bit.
greens-01 rotated 90 degrees right and moved to the right a little bit.
ribbon-01 moved down a little bit and to the left a little bit.
flower-02 to the bottom of the frame layer on the right.
flower-01 to the top of the frame layer on the right.
Add any other elements of your choice.
Add your image or tube of choice. When it is added, use your magic wand to select inside the frame. Selections, Modify, Expand, 3, Selections, Invert. On your tube/image layer, hit delete on your keyboard.
Drop shadow your layers and merge them where you would like.
Add your copyright at this time for the scrapkit.
Add your text of choice, I used Pea Lazy Llama for the text and the font, with a medium 3.0 white gradient glow if desired. You could also use a white drop shadow to create the same results.
Hope you enjoyed this tutorial! Please feel free to send me your results!
May 14, 2009
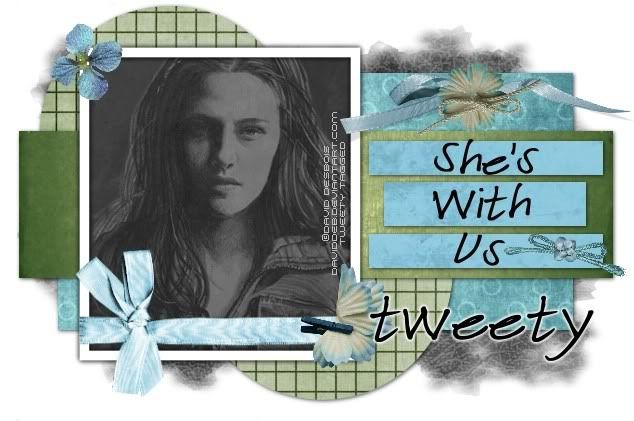
The Saga Character Collection : Esme
Feel free to use my tutorial in any way you would like. Although it is my ideas that will guide you, please feel free to do whatever you choose with it!
This tutorial assumes you have a working knowledge of PSP.
Needed supplies:
Scrap Kit of choice or the one I am using. This kit is by Pimp'd Tag Scraps and can be purchased at Sophisti-Scraps called The Saga Character Collection : Esme.
Masks of Choice: the masks I used came from Chelle under downloads. Her site can be found here.
I used WSL_254.
Template: Yvette's twilight templates can be found on her site here.
I used template two which can be found here.
Image of choice. I am using the wonderful work of Amanda Fontaine which I have a license to use. Please do not use this work with out the correct license. This image was purchased at AMI but is no longer available.
Open all supplies needed for this tutorial. Add the mask to your mask file or open them in PSP. I use these quite a bit.
Shift + D to duplicate your template. Delete the copyright on your duplicated template layer. Close out the original template.
Copy and paste pp12 as a new layer. Resize it to fit the tag, and then Layers, Load/Save Mask from Disk, Load Mask, Choose Chelle's WSL_254. Merge, merge group. This layer should be just above your white background.
If you are unfamiliar with a template it is very simple and easy to use. Basically, you click on the layer you wish to color. Then, Selections, Select All, Selections Float, Selections Defloat, Selection Invert (for papers) and then select the paper layer and hit the delete key on your keyboard. If you are using a flood fill color, just add a new layer and flood fill the selection. If you are using a round shape, you would also need to go to Selections, Smooth, 10 for settings, then Invert. I won't be writing these directions out everytime.
Below you will find the template layer and the paper layer used in my tag.
rounded rectangle - pp02
tone - left as is.
shapes - pp11
background - pp03
frame - floodfilled black.
wordart - deleted and used a Esme quote. Twilight Font
I added a 1, 1, 70, 5 black drop shadow and repeated it with -1, -1 to all the template layers.
Add your elements of choice. See tag for exact placement and resize as necessary. I added:
glitter-doodle - rotated 45 degrees to the right and placed under the frame and background layer.
tied-corner to the top left corner.
flower-05 to the top left corner.
swag to the middle of the frame on the bottom.
string to the top right of the tag.
butterfly-brooch to the middle left of the frame.
flower-02 to the top right of the tag on top of the string.
button to the top right of the tag on top of the flower-02.
Add any other elements of your choice.
Misting an image is very easy. Using your magic wand, freehand selection, use these options:
Click on the image and choose Promote Background Layer. Now, start anywhere in the image you want to begin. What you are going to do is left click to place the pointer and then move the line to the next point and click again to make a rough cutout of the portion of the image you would like to mist. When you are done, right click and the selection will be made. Then, hit delete on your keyboard once or twice to feather the image around it.Now add your tube to the tag and resize as needed.
Drop shadow your layers and merge them where you would like.
Add your copyright at this time for the scrapkit.
Add your text of choice, I used Pea Sean for the text and the font, with a medium 3.0 white gradient glow if desired. You could also use a white drop shadow to create the same results.
Hope you enjoyed this tutorial! Please feel free to send me your results!
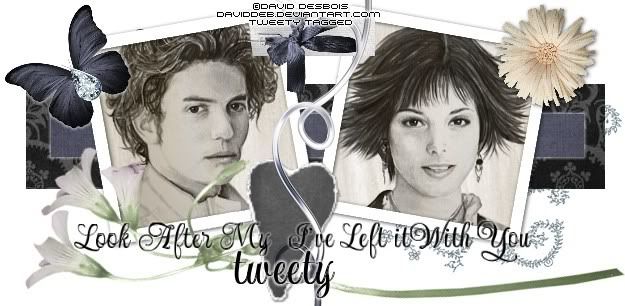
The Saga Character Collection : Carlisle
Feel free to use my tutorial in any way you would like. Although it is my ideas that will guide you, please feel free to do whatever you choose with it!
This tutorial assumes you have a working knowledge of PSP.
Needed supplies:
Scrap Kit of choice or the one I am using. This kit is by Pimp'd Tag Scraps and can be purchased at Sophisti-Scraps called The Saga Character Collection : Carlisle.
Masks of Choice: the masks I used came from Chelle under downloads. Her site can be found here.
I used WSL_228.
Template: Yvette's twilight templates can be found on her site here.
I used template three which can be found here.
Image of choice. My image is by David Desbois. You can visit his deviantart site here. I have permission from him to use his artwork in my tutorials.
Open all supplies needed for this tutorial. Add the mask to your mask file or open them in PSP. I use these quite a bit.
Shift + D to duplicate your template. Delete the copyright on your duplicated template layer. Close out the original template.
Copy and paste pp06 as a new layer. Resize it to fit the tag, and then Layers, Load/Save Mask from Disk, Load Mask, Choose Chelle's WSL_228. Merge, merge group. This layer should be just above your white background.
If you are unfamiliar with a template it is very simple and easy to use. Basically, you click on the layer you wish to color. Then, Selections, Select All, Selections Float, Selections Defloat, Selection Invert (for papers) and then select the paper layer and hit the delete key on your keyboard. If you are using a flood fill color, just add a new layer and flood fill the selection. If you are using a round shape, you would also need to go to Selections, Smooth, 10 for settings, then Invert. I won't be writing these directions out everytime.
Below you will find the template layer and the paper layer used in my tag.
large rectangle - pp11
circle 2 - pp08
circle 1 - pp08
rectangle 1 - pp03
slats - pp02
background - pp01
frame - kept white
wordart - deleted and used a Carlisle quote.
I added a 1, 1, 70, 5 black drop shadow and repeated it with -1, -1 to all the template layers.
Add your elements of choice. See tag for exact placement and resize as necessary. I added:
ribbon-02 to the bottom of the frame, mirrored.
ribbon-05 to the top of the slats layer above the slats on the right.
tied-flower above the slats on the ribbon-05 layer.
bow-02 to the slat area next to the bottom slat word.
clipped-flower to the bottom right of the frame layer.
flower-03 to the top left corner of the frame layer.
flower-02 to the bottom of the slat layer on top of bow-03.
Add any other elements of your choice.
Misting an image is very easy. Using your magic wand, freehand selection, use these options:
Click on the image and choose Promote Background Layer. Now, start anywhere in the image you want to begin. What you are going to do is left click to place the pointer and then move the line to the next point and click again to make a rough cutout of the portion of the image you would like to mist. When you are done, right click and the selection will be made. Then, hit delete on your keyboard once or twice to feather the image around it.Now add your misted image to the tag! The Bella image has a transparency of 42 and on the Luminance mode, which was placed underneath the first misted image of the couple.
Drop shadow your layers and merge them where you would like.
Add your copyright at this time for the scrapkit.
Add your text of choice, I used Pea Soniablu for the text and the font, with a medium 3.0 white gradient glow if desired. You could also use a white drop shadow to create the same results.
Hope you enjoyed this tutorial! Please feel free to send me your results!
The Saga Character Collection : Jasper

Feel free to use my tutorial in any way you would like. Although it is my ideas that will guide you, please feel free to do whatever you choose with it!
This tutorial assumes you have a working knowledge of PSP.
Needed supplies:
Scrap Kit of choice or the one I am using. This kit is by Pimp'd Tag Scraps and can be purchased at Sophisti-Scraps called The Saga Character Collection : Jasper
Masks of Choice: the masks I used came from Chelle under downloads. Her site can be found here.
I used WSL_222.
Template: Yvette's twilight templates can be found on her site here.
I used template one which can be found here.
Image of choice. My image is by David Desbois. You can visit his deviantart site here. I have permission from him to use his artwork in my tutorials.
Open all supplies needed for this tutorial. Add the mask to your mask file or open them in PSP. I use these quite a bit.
Shift + D to duplicate your template. Delete the copyright on your duplicated template layer. Close out the original template.
Copy and paste pp13 as a new layer. Resize it to fit the tag, and then Layers, Load/Save Mask from Disk, Load Mask, Choose Chelle's WSL_222. Stretch this layer to peek out of the template.
If you are unfamiliar with a template it is very simple and easy to use. Basically, you click on the layer you wish to color. Then, Selections, Select All, Selections Float, Selections Defloat, Selection Invert (for papers) and then select the paper layer and hit the delete key on your keyboard. If you are using a flood fill color, just add a new layer and flood fill the selection. If you are using a round shape, you would also need to go to Selections, Smooth, 10 for settings, then Invert. I won't be writing these directions out everytime.
Below you will find the template layer and the paper layer used in my tag.
Square - pp9
Rectangles - pp2
Obsessed - pp10
Twilight - pp6
Dots - none
Add your elements of choice. See tag for exact placement and resize as necessary. I added:
ribbon-03 just above your mask layer to the left a little bit.
staple on the notebook paper layer, rotated 90 degrees and to the left of the notebook paper layer.
greens-01 resized 31% and moved to the bottom left of the green paper layer. Duplicate, Image Mirror.
flower-03 to the top right of the notebook paper layer in the corner.
cb-edge to the top left corner of the notebook paper layer.
border to the top of the tag stretched across to the ends of the green paper layer.
bow-01 to the top left of the green paper layer, on the border. Duplicate and mirror.
Add any other elements of your choice.
Misting an image is very easy. Using your magic wand, freehand selection, use these options:
Click on the image and choose Promote Background Layer. Now, start anywhere in the image you want to begin. What you are going to do is left click to place the pointer and then move the line to the next point and click again to make a rough cutout of the portion of the image you would like to mist. When you are done, right click and the selection will be made. Then, hit delete on your keyboard once or twice to feather the image around it.Now add your misted image to the tag!
Drop shadow your layers and merge them where you would like.
Add your copyright at this time for the scrapkit.
Add your text of choice, I used Pea Andrea for the text and the font, with a medium 3.0 white gradient glow if desired. You could also use a white drop shadow to create the same results.
Hope you enjoyed this tutorial! Please feel free to send me your results!
The Saga Character Collection : Alice
Feel free to use my tutorial in any way you would like. Although it is my ideas that will guide you, please feel free to do whatever you choose with it!
This tutorial assumes you have a working knowledge of PSP.
Needed supplies:
Scrap Kit of choice or the one I am using. This kit is by Pimp'd Tag Scraps and can be purchased at Sophisti-Scraps called The Saga Character Collection : Alice
Template: Yvette's twilight templates can be found on her site here.
I used template four which can be found here.
Image of choice. My image is by David Desbois. You can visit his deviantart site here. I have permission from him to use his artwork in my tutorials.
Open all supplies needed for this tutorial.
Shift + D to duplicate your template. Delete the copyright on your duplicated template layer. Close out the original template.
If you are unfamiliar with a template it is very simple and easy to use. Basically, you click on the layer you wish to color. Then, Selections, Select All, Selections Float, Selections Defloat, Selection Invert (for papers) and then select the paper layer and hit the delete key on your keyboard. If you are using a flood fill color, just add a new layer and flood fill the selection. If you are using a round shape, you would also need to go to Selections, Smooth, 10 for settings, then Invert. I won't be writing these directions out everytime.
Below you will find the template layer and the paper layer used in my tag.
Rectangle1 - pp8
Rectangle2 - pp5 with white diffuse 3.0 gradient glow or drop shadow.
Backgrounds - pp3
frames - white flood fill
heart - deleted (used an element)
wordart - black
Add your elements of choice. See tag for exact placement and resize as necessary. I added:
doodle-glitter-01 under the bottom template layer toward the right bottom
flower-06 to the bottom rotated 90 degrees
paper-heart replace the heart in the template with this heart
butterfly rotated a bit to the left and placed in the top left corner
paper-tab in the middle of the frames toward the top
bow-02 to the middle of the frames toward the top above the paper-tab
flower-07 to the right top frame
leaf-doodle not resized in the middle of the tag.
Misting an image is very easy. Using your magic wand, freehand selection, use these options:
Click on the image and choose Promote Background Layer. Now, start anywhere in the image you want to begin. What you are going to do is left click to place the pointer and then move the line to the next point and click again to make a rough cutout of the portion of the image you would like to mist. When you are done, right click and the selection will be made. Then, hit delete on your keyboard once or twice to feather the image around it.Now add your misted image to the tag! My Jasper was mirrored and resized to fit into the frame.
I also changed the lighting to luminance on both images.
Add any other elements of your choice.
Drop shadow your layers and merge them where you would like.
Add your copyright at this time for the scrapkit.
Add your text of choice, I used UpDock ROB for the text and the font, with a medium 3.0 white gradient glow if desired. You could also use a white drop shadow to create the same results.
Hope you enjoyed this tutorial! Please feel free to send me your results!
May 11, 2009
The Saga Character Collection : Emmett

Feel free to use my tutorial in any way you would like. Although it is my ideas that will guide you, please feel free to do whatever you choose with it!
This tutorial assumes you have a working knowledge of PSP.
Needed supplies:
Scrap Kit of choice or the one I am using. This kit is by Pimp'd Tag Scraps and can be purchased at Sophisti-Scraps called The Saga Character Collection : Emmett
Masks of Choice: the masks I used came from Chelle under downloads. Her site can be found here.
I used WSL_222.
Image of choice. My image is by David Desbois. You can visit his deviantart site here. I have permission from him to use his artwork in my tutorials.
Open all supplies needed for this tutorial. Add the mask to your mask file or open them in PSP. I use these quite a bit.
Copy and paste pp06 as a new layer. Layers, Load/Save Mask, Load mask from Disk, choose Mask222 by Chelle. Merge Group.
Copy and paste the frame-02. Resize to fit the tag. Copy and paste your tube or image as a new layer resize to just bigger than the frame. Click inside the frame using your magic wand and selections, modify, expand by 5. Selections, invert. Hit delete on your tube/image layer.
Add your elements of choice. See tag for exact placement and resize as necessary. I added:
splatter-03 to the top left under the frame layer.
splatter-04 to the bottom left under the frame layer rotated to show under the frame.
swirl-01 under the frame in the top left of the tag.
greens-04 mirrored and placed under the largest of the frame on the bottom left.
stitched-flower to the bottom middle of the frames.
bow-01 to the top middle of the frames.
Add any other elements of your choice.
Drop shadow your layers and merge them where you would like.
Add your copyright at this time for the scrapkit.
Add your text of choice, I used Amanda Hand for the text and the font, with a medium 3.0 white gradient glow if desired. You could also use a white drop shadow to create the same results.
Hope you enjoyed this tutorial! Please feel free to send me your results!
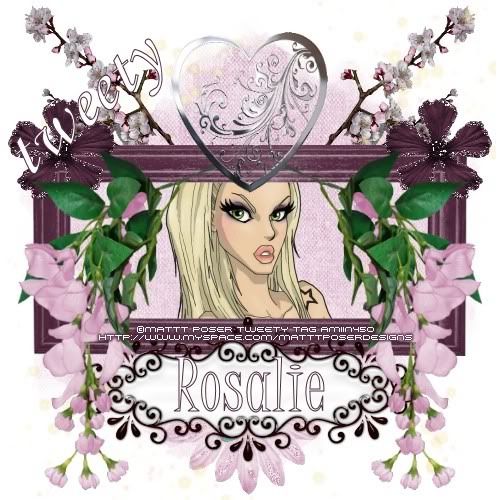
The Saga Character Collection : Rosalie
Feel free to use my tutorial in any way you would like. Although it is my ideas that will guide you, please feel free to do whatever you choose with it!
This tutorial assumes you have a working knowledge of PSP.
Needed supplies:
Scrap Kit of choice or the one I am using. This kit is by Pimp'd Tag Scraps and can be purchased at Sophisti-Scraps called The Saga Character Collection : Rosalie
Masks of Choice: the masks I used came from Chelle under downloads. Her site can be found here.
I used WSL_220.
Image of choice. I am using the wonderful work of Mattt Poser which I have a license to use. Please do not use this work with out the correct license. If you wish to get a license please visit AMI.
Open all supplies needed for this tutorial. Add the mask to your mask file or open them in PSP. I use these quite a bit.
Copy and paste pp12 as a new layer. Layers, Load/Save Mask, Load mask from Disk, choose Mask220 by Chelle. Merge Group.
Copy and paste the frame-01. Resize to fit the tag. Copy and paste your tube or image as a new layer resize to just bigger than the frames. Click inside the frame using your magic wand and selections, modify, expand by 5. Selections, invert. Hit delete on your tube/image layer.
Add your elements of choice. See tag for exact placement and resize as necessary. I added:
flower-03 to the top left of the tag under the frame layer. Rotate it to stick out the top. Duplicate and mirror.
dazzle-dust under the frame layer in the middle.
flower-02 to the middle top of the frame layer hanging over the frame on the left. Duplicate and mirror.
journal to the bottom middle of the frame.
flower-04 to the bottom of the frame under the journal layer.
flower-05 to the top right of the frame. Duplicate and mirror.
heart-scrolled to the top middle of the frame layer.
Add any other elements of your choice.
Drop shadow your layers and merge them where you would like.
Add your copyright at this time for the scrapkit.
Add your text of choice, I used Monotype Corsiva font for the text and Juice ITC for the word "Rosalie" in the middle of the tag.
Hope you enjoyed this tutorial! Please feel free to send me your results!
April 8, 2009
Mid Summer Night

Feel free to use my tutorial in any way you would like. Although it is my ideas that will guide you, please feel free to do whatever you choose with it!
This tutorial assumes you have a working knowledge of PSP.
Needed supplies:
Scrap Kit of choice or the one I am using. This kit is by Pimp'd Tag Scraps and can be purchased at Sophisti-Scraps called Mid Summers Night
Masks of Choice: the masks I used came from Chelle under downloads. Her site can be found here.
I used WSL_241.
Plugins: EyeCandy4000, Gradient Glow, and Xenofex 2: Constellation for the animation.
I also used Mura's copies, and her site is now closed. However her terms allow sharing of her filters which you can get here.
Image of choice. My image is by David Desbois. You can visit his deviantart site here. I have permission from him to use his artwork in my tutorials.
Open all supplies needed for this tutorial. Add the mask to your mask file or open them in PSP. I use these quite a bit.
Copy and paste pp8 as a new layer. Layers, Load/Save Mask, Load mask from Disk, choose Mask241 by Chelle.
Copy and paste the frame-07. Resize to fit the tag. Rotate 45 degrees left. Copy and paste pp-06 as a new layer resize to just bigger than the frames. Click inside the frame using your magic wand and selections, modify, expand by 5. Selections, invert. Hit delete on your paper layer.
Copy and paste your image of choice and resize to fit. Click inside the one frame using your magic wand and selections, modify, expand by 5. Selections, invert. Hit delete on your image layer. Repeat for the following 2 frames.
Add your elements of choice. See tag for exact placement and resize as necessary. I added:
silver-stars to the top right of the tag under the frame layer.
star-cluster to the top left of the tag under the frame layer.
flower-06 to the top left of the tag under the frame layer.
flower-12 to the frame layer on the bottom rotated 45 degrees left.
ribbon-02 to the middle top of the frame layer hanging over the frame.
butterfly-01 to the top right of the frame.
cloud to the bottom of the frame without rotating.
stars-02 to the middle of the tag under the frame layer. Mura Copies with these settings.
 Click on your mask layer. Selections, Select all, selections, float, selections, defloat, selections, invert. Back to the star layer, hit delete on your keyboard. The stars should only be seen in the mask layer.
Add any other elements of your choice.
Drop shadow your layers and merge them where you would like.
Add your copyright at this time for the scrapkit.
Add your text of choice, I used twilight font for the word twilight and freely font for the text. You can google to find it. I added a medium 3.0 white glow to my font and the constellation settings shown below.

ANIMATION:
Duplicate the black frame layers for a total of 3 layers. On the first layer, Effects, Plugins, Xenofex: Constellation with the following settings:
Repeat the above step on the next heart layer and then hit random seed. Repeat this a third time on the bottom layer.
Open Animation Shop. In PSP, close off 2 of the animation layers. Copy, Copy Merged. Paste as New Animation in AS. Back in PSP, close off the current frame layer. Open the 2nd layer. Copy, Copy Merged. Paste as New Animation in AS. Back in PSP, close off the current frame layer. Open the 3rd layer and repeat the above steps.
View your animation. If you are happy with it, save it with the highest optimizations.
Hope you enjoyed this tutorial! Please feel free to send me your results!
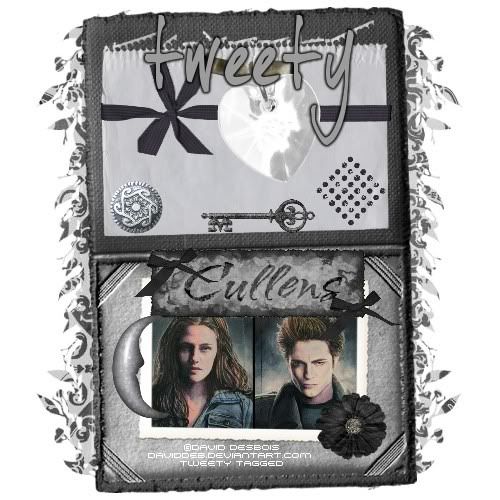
Midnight
Feel free to use my tutorial in any way you would like. Although it is my ideas that will guide you, please feel free to do whatever you choose with it!
This tutorial assumes you have a working knowledge of PSP.
Needed supplies:
Scrap Kit of choice or the one I am using. This kit is by Pimp'd Tag Scraps and can be purchased at Sophisti-Scraps called The Saga : Add On : Midnight.
Masks of Choice: the masks I used came from Chelle under downloads. Her site can be found here.
I used WSL_251.
Plugins: EyeCandy4000, Gradient Glow
Image of choice. My image is by David Desbois. You can visit his deviantart site here. I have permission from him to use his artwork in my tutorials.
Open all supplies needed for this tutorial. Add the mask to your mask file or open them in PSP. I use these quite a bit.
Copy and paste pp7 as a new layer. Layers, Load/Save Mask, Load mask from Disk, choose Mask251 by Chelle. Rotate 90 degrees left.
Copy and paste the book-frame. Resize to fit the tag. Rotate 90 degrees left. Copy and paste your image of choice and resize to fit. Click inside the frame using your magic wand and selections, modify, expand by 5. Selections, invert. Hit delete on your image layer.
Add your elements of choice. See tag for exact placement and resize as necessary. I added:
book-paper rotated 90 degrees left to the top of the book-frame, centered.
staple to the center of the book-paper.
lil-heart-charm to the staple and erase part of the charm hook to make it appear to be hooked on the staple.
wrap-2 rotated 90 degrees left under the lil-heart-charm layer.
stamp-02 to the bottom of the book-paper layer on the right.
vintage-key to the bottom of the book-paper layer in the middle.
button to the bottom of the book-paper layer on the left.
tag-cullens to the middle of the book-frame centered.
moon to the left bottom of the frame layer.
flower-03 to the right bottom of the picture frame.
bow-02 to the top left of the tag-cullens. Duplicate it and move to the bottom right.
Add any other elements of your choice.
Drop shadow your layers and merge them where you would like.
Add your copyright at this time for the scrapkit.
Add your text of choice, I used Joehand (Alice Cullens' Font). You can google to find it. I added a medium 3.0 black glow to my font.
Hope you enjoyed this tutorial! Please feel free to send me your results!
March 14, 2009
The Happily Ever After

Feel free to use my tutorial in any way you would like. Although it is my ideas that will guide you, please feel free to do whatever you choose with it!
This tutorial assumes you have a working knowledge of PSP.
Needed supplies:
Scrap Kit of choice or the one I am using. This kit is by Pimp'd Tag Scraps and can be purchased at Sophisti-Scraps in the full Saga Collection or as a separate kit.
Masks of Choice: the masks I used came from Chelle under downloads. Her site can be found here
I used WSL_177 and 176.
Plugins: EyeCandy4000, Gradient Glow
Image of choice. My image is by David Desbois. You can visit his deviantart site here. I have permission from him to use his artwork in my tutorials.
Open all supplies needed for this tutorial. Add the mask to your mask file or open them in PSP. I use these quite a bit.
Copy and paste pp12 as a new layer. Layers, Load/Save Mask, Load mask from Disk, choose Mask177 by WSL. Merge Group.
Copy and paste pp11 as a new layer. Layers, Load/Save Mask, Load mask from Disk, choose Mask176 by WSL. Merge Group. Merge the mask layers together.
Copy and paste the wrapped-frame. Resize to fit the tag. Copy and paste your image of choice and resize to fit. Click inside the frame using your magic wand and selections, modify, expand by 5. Selections, invert. Hit delete on your image layer.
Add your elements of choice. See tag for exact placement and resize as necessary. I added:
rose to the left of the frame rotated to stick out on the left.
feather to the right top of the frame rotated to stick out on the right.
green-01 to the right top of the frame mirrored and sticking out on the right.
flora-03 to the right top of the frame sticking out on the right.
flora-01 to the top right of the frame sticking out on the right.
flora-frame-paper rotated 90 degrees right. Move this over the image and using your eraser erase the bottom frame so the top frame is in the image.
old-frame-01 around the frame already in place. Erase the bottom of the frame so it looks like it is under the ribbon.
heart-locket over the image like it frames the picture.
bow-01 over the rose rotated so it appears to be on the stem.
ribbon-roses resized and placed just above the top of the frame, centered.
flower-02 to the bottom of the frame over the old-frame-01 layer. White 3.0 medium gradient glow to this element.
flower-01 on the bottom of the frame over the flower-02. Merge this layer with the other frame layer. Duplicate this pair and move to the top right of the frame.
Add any other elements of your choice.
Drop shadow your layers and merge them where you would like.
Add your copyright at this time for the scrapkit.
Add your text of choice, I used Be Safe (Edward Cullen's Font). You can google to find it. I added a medium 3.0 white glow to my font. I also added "The Happily Ever After" to the top of the tag.
Hope you enjoyed this tutorial! Please feel free to send me your results!
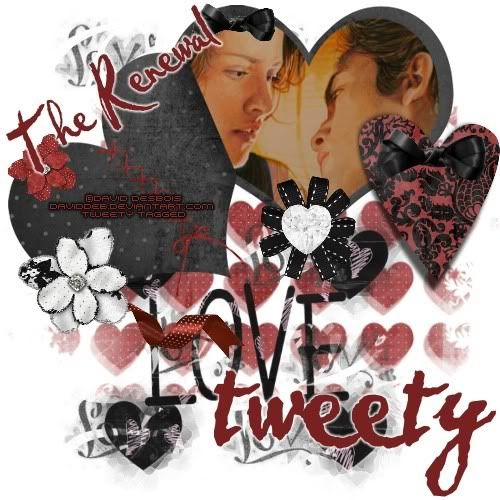
The Renewal
Feel free to use my tutorial in any way you would like. Although it is my ideas that will guide you, please feel free to do whatever you choose with it!
This tutorial assumes you have a working knowledge of PSP.
Needed supplies:
Scrap Kit of choice or the one I am using. This kit is by Pimp'd Tag Scraps and can be purchased at Sophisti-Scraps in the full Saga Collection or as a separate kit.
Masks of Choice: the masks I used came from Vix under goodies. Her site can be found here
I used Vix316, 30 and 312.
Plugins: EyeCandy4000, Gradient Glow
Image of choice. My image is by David Desbois. You can visit his deviantart site here. I have permission from him to use his artwork in my tutorials.
Open all supplies needed for this tutorial. Add the mask to your mask file or open them in PSP. I use these quite a bit.
Copy and paste pp06 as a new layer. Layers, Load/Save Mask, Load mask from Disk, choose Mask316 by Vix. Merge Group.
Copy and paste pp04 as a new layer. Layers, Load/Save Mask, Load mask from Disk, choose Mask30 by Vix. Merge Group. Make this mask layer smaller and then move toward the bottom middle of the tag.
Copy and paste the heart-frame. Resize to fit the tag. Move to the top of the tag. Copy and paste your image of choice and resize to fit. Click inside the frame using your magic wand and selections, modify, expand by 5. Selections, invert. Hit delete on your image layer.
Add your elements of choice. See tag for exact placement and resize as necessary. I added:
This tutorial assumes you have a working knowledge of PSP.
Needed supplies:
Scrap Kit of choice or the one I am using. This kit is by Pimp'd Tag Scraps and can be purchased at Sophisti-Scraps in the full Saga Collection or as a separate kit.
Masks of Choice: the masks I used came from Vix under goodies. Her site can be found here
I used Vix316, 30 and 312.
Plugins: EyeCandy4000, Gradient Glow
Image of choice. My image is by David Desbois. You can visit his deviantart site here. I have permission from him to use his artwork in my tutorials.
Open all supplies needed for this tutorial. Add the mask to your mask file or open them in PSP. I use these quite a bit.
Copy and paste pp06 as a new layer. Layers, Load/Save Mask, Load mask from Disk, choose Mask316 by Vix. Merge Group.
Copy and paste pp04 as a new layer. Layers, Load/Save Mask, Load mask from Disk, choose Mask30 by Vix. Merge Group. Make this mask layer smaller and then move toward the bottom middle of the tag.
Copy and paste pp03 as a new layer. Layers, Load/Save Mask, Load mask from Disk, choose Mask312 by Vix. Merge Group.
Copy and paste the heart-frame. Resize to fit the tag. Move to the top of the tag. Copy and paste your image of choice and resize to fit. Click inside the frame using your magic wand and selections, modify, expand by 5. Selections, invert. Hit delete on your image layer.
Add your elements of choice. See tag for exact placement and resize as necessary. I added:
tied to the heart-frame rotated until it fits the heart.
crimson-ribbon to the left middle of the tag on the frame layer.
lifted-tag-heart to the right middle of the tag on the frame layer.
lil-bow to the top of the frame layer.
ribbon-flower01 to the bottom in the middle of the 2nd heart in the frame.
ice-heart on top of the ribbon-flower01 as a middle accent.
flower-03 covering crimson-ribbon on the left of the frame.
flower-02 to the top of the 1st heart on the frame.
Add any other elements of your choice.
Drop shadow your layers and merge them where you would like.
Add your copyright at this time for the scrapkit.
Add your text of choice, I used Pablo (Bella Swan's Font). You can google to find it. I added a medium 3.0 white glow to my font. I also added "The Renewal" to the top of the tag rotated 35 degrees to the left.
Hope you enjoyed this tutorial! Please feel free to send me your results!
The Pause

Feel free to use my tutorial in any way you would like. Although it is my ideas that will guide you, please feel free to do whatever you choose with it!
This tutorial assumes you have a working knowledge of PSP.
Needed supplies:
Scrap Kit of choice or the one I am using. This kit is by Pimp'd Tag Scraps and can be purchased at Sophisti-Scraps in the full Saga Collection or as a separate kit.
Masks of Choice: the masks I used came from Vix under goodies. Her site can be found here
I used Vix237 and 238.
Plugins: EyeCandy4000, Gradient Glow
Image of choice. My image is by David Desbois. You can visit his deviantart site here. I have permission from him to use his artwork in my tutorials.
Open all supplies needed for this tutorial. Add the mask to your mask file or open them in PSP. I use these quite a bit.
Copy and paste pp1 as a new layer. Layers, Load/Save Mask, Load mask from Disk, choose Mask238 by Vix. Merge Group. Copy and paste pp09 as a new layer. Layers, Load/Save Mask, Load mask from Disk, choose Mask238 by Vix. Merge Group.
Copy and paste the frame. Resize to fit the tag. Move to the left of the tag. Copy and paste your image of choice and resize to fit. Click inside the frame using your magic wand and selections, modify, expand by 5. Selections, invert. Hit delete on your image layer. Copy and paste circle-frame as a new layer. Move to the top right of your tag. Copy and paste your image of choice and resize to fit. Click inside the frame using your magic wand and selections, modify, expand by 5. Selections, invert. Hit delete on your image layer.
Add your elements of choice. See tag for exact placement and resize as necessary. I added:
rusty-screw to the top right of the top frame.
rusty-eyelet to the top right of the top frame under the rusty-screw.
leaf-01 to the bottom under the bottom frame.
woodland to the bottom of the bottom frame.
worn-heart to the middle of the two frames toward the top corner of the bottom frame.
wrapped-bow to the bottom frame toward the bottom.
flower-01 to the right side of the wrapped-bow.
flower-02 to the left side of the wrapped-bow.
natural-tag-line rotated 90 degrees right and placed on the right of the bottom frame.
heart-trinket to the middle of the frames.
Add any other elements of your choice.
Drop shadow your layers and merge them where you would like.
Add your copyright at this time for the scrapkit.
Add your text of choice, I used Almagro Regular (Jacob Black's Font). You can google to find it. I added a medium 3.0 brown glow to my font. I also added "The Pause" to the top of the tag.
Hope you enjoyed this tutorial! Please feel free to send me your results!
March 13, 2009
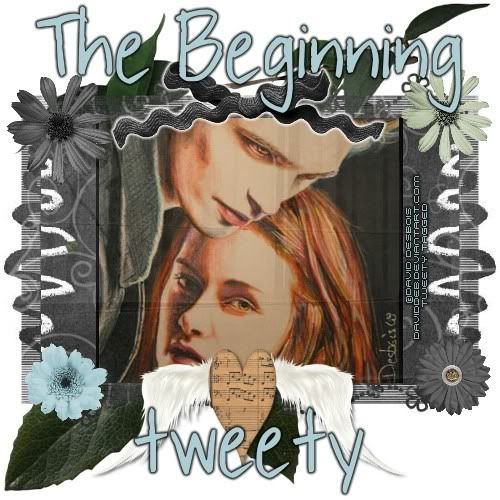
The Beginning
Feel free to use my tutorial in any way you would like. Although it is my ideas that will guide you, please feel free to do whatever you choose with it!
This tutorial assumes you have a working knowledge of PSP.
Needed supplies:
Scrap Kit of choice or the one I am using. This kit is by Pimp'd Tag Scraps and can be purchased at Sophisti-Scraps in the full Saga Collection or as a separate kit.
Masks of Choice: the masks I used came from Chelle under downloads. Her site can be found here
I used Chelle's WSL233.
Plugins: EyeCandy4000, Gradient Glow
Image of choice. My image is by David Desbois. You can visit his deviantart site here. I have permission from him to use his artwork in my tutorials.
Open all supplies needed for this tutorial. Add the mask to your mask file or open them in PSP. I use these quite a bit.
Copy and paste pp8 as a new layer. Layers, Load/Save Mask, Load mask from Disk, choose Mask233 by WSL. Merge Group. Copy and paste pp12 as a new layer. On the mask layer click selections, select all, selections, float, selections, defloat, selections, invert. Now hit delete on the pp12 layer. Reduce the transparency of this layer to 18. Do not deselect.
Copy and paste your image of choice. After it is centered using your move and resize tools, hit delete on your keyboard. Move this layer under pp12, which will create an overlay effect. Selections, Select None.
Add your elements of choice. See tag for exact placement and resize as necessary. I added:
green-01 to the bottom most layer, moved toward the top and mirrored.
green-01 to the bottom, moved toward the bottom.
rr-bow-01 to the top and a white 3.0 medium gradient glow.
flower-03 to the top left of the mask frame.
flower-04 to the bottom right of the mask frame.
flower-02 to the top right of the mask frame.
flower-01 to the bottom left of the mask frame.
feather-heart to the middle bottom of the mask frame, and a light drop shadow. I used 2, 2, 58, 4.
Add any other elements of your choice.
Drop shadow your layers and merge them where you would like.
Add your copyright at this time for the scrapkit. I added a gradient glow to my copyright.
Add your text of choice, I used Pea Sue Print. You can google to find it. I added a medium 3.0 white glow to my font. I also added "The Beginning" to the top of the tag.
Hope you enjoyed this tutorial! Please feel free to send me your results!
Subscribe to:
Posts (Atom)
About Me

Want to receive some of the tutorial tags created by me?

Click to join tweetytags