Follow Me
Tag Corner
Join TagCorner! I did!
April 8, 2009
Mid Summer Night

Feel free to use my tutorial in any way you would like. Although it is my ideas that will guide you, please feel free to do whatever you choose with it!
This tutorial assumes you have a working knowledge of PSP.
Needed supplies:
Scrap Kit of choice or the one I am using. This kit is by Pimp'd Tag Scraps and can be purchased at Sophisti-Scraps called Mid Summers Night
Masks of Choice: the masks I used came from Chelle under downloads. Her site can be found here.
I used WSL_241.
Plugins: EyeCandy4000, Gradient Glow, and Xenofex 2: Constellation for the animation.
I also used Mura's copies, and her site is now closed. However her terms allow sharing of her filters which you can get here.
Image of choice. My image is by David Desbois. You can visit his deviantart site here. I have permission from him to use his artwork in my tutorials.
Open all supplies needed for this tutorial. Add the mask to your mask file or open them in PSP. I use these quite a bit.
Copy and paste pp8 as a new layer. Layers, Load/Save Mask, Load mask from Disk, choose Mask241 by Chelle.
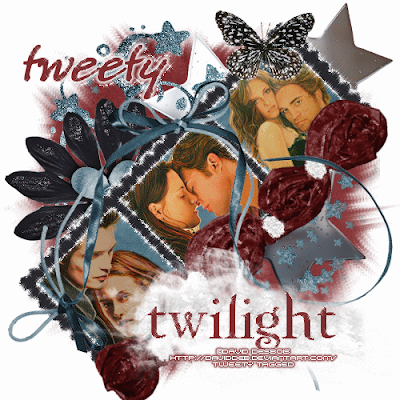
Copy and paste the frame-07. Resize to fit the tag. Rotate 45 degrees left. Copy and paste pp-06 as a new layer resize to just bigger than the frames. Click inside the frame using your magic wand and selections, modify, expand by 5. Selections, invert. Hit delete on your paper layer.
Copy and paste your image of choice and resize to fit. Click inside the one frame using your magic wand and selections, modify, expand by 5. Selections, invert. Hit delete on your image layer. Repeat for the following 2 frames.
Add your elements of choice. See tag for exact placement and resize as necessary. I added:
silver-stars to the top right of the tag under the frame layer.
star-cluster to the top left of the tag under the frame layer.
flower-06 to the top left of the tag under the frame layer.
flower-12 to the frame layer on the bottom rotated 45 degrees left.
ribbon-02 to the middle top of the frame layer hanging over the frame.
butterfly-01 to the top right of the frame.
cloud to the bottom of the frame without rotating.
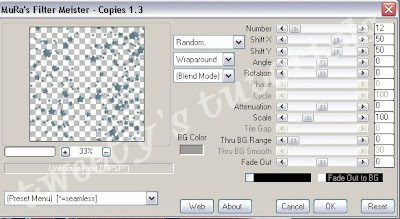
stars-02 to the middle of the tag under the frame layer. Mura Copies with these settings.
 Click on your mask layer. Selections, Select all, selections, float, selections, defloat, selections, invert. Back to the star layer, hit delete on your keyboard. The stars should only be seen in the mask layer.
Add any other elements of your choice.
Drop shadow your layers and merge them where you would like.
Add your copyright at this time for the scrapkit.
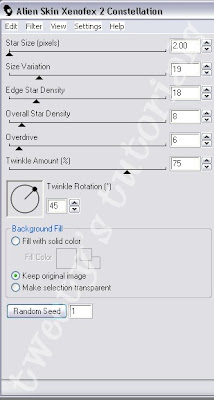
Add your text of choice, I used twilight font for the word twilight and freely font for the text. You can google to find it. I added a medium 3.0 white glow to my font and the constellation settings shown below.

ANIMATION:
Duplicate the black frame layers for a total of 3 layers. On the first layer, Effects, Plugins, Xenofex: Constellation with the following settings:

Repeat the above step on the next heart layer and then hit random seed. Repeat this a third time on the bottom layer.
Open Animation Shop. In PSP, close off 2 of the animation layers. Copy, Copy Merged. Paste as New Animation in AS. Back in PSP, close off the current frame layer. Open the 2nd layer. Copy, Copy Merged. Paste as New Animation in AS. Back in PSP, close off the current frame layer. Open the 3rd layer and repeat the above steps.
View your animation. If you are happy with it, save it with the highest optimizations.
Hope you enjoyed this tutorial! Please feel free to send me your results!
Labels:
Twilight
Subscribe to:
Post Comments (Atom)
About Me
Want to receive some of the tutorial tags created by me?
Click to join tweetytags
3 comments:
love it!!
I love all your twilight tuts Hope to see some more tw ilight tuts in the future you can never get to much edward lol
can't find the mid summers night kit anymore
Post a Comment